This article explains a few simple methods of pad care starting with pad prep, then proper pad pressure and use, then finishing off with proper pad cleaning. With proper pad care your pads should last many details. However…If you do not follow proper pad use and maintenance your pads can fail on the very first use!
Pad Prep
It is very important to dampen the pad throughout, this does not mean dripping wet or barely misted with water. When the pad is dampened properly it will become very flexible and much easier to use. If the pad is dampened too much it will sling product everywhere and make a very undesirable mess on the vehicle and yourself! On the flip side if the pad is under dampened it will be difficult to use due to the stiffness of the pad and also be difficult for the product to absorb into the pad properly. Also if the pad is under dampened or not dampened at all, the foam will be brittle and tear/shred while you are using the pad. The following is the method I personally use to prep my pads.
Items Requires: Plastic Bucket, Clean Towel, Water.
STEP 1
I first SOAK the pad throughout. This can be done in two ways, under running water or in a bucket half filled with water. Under running water massage and squeeze the pad until it absorbs water throughout the pad. If using a bucket of water you can hold the pad under the water and squeeze the pad a few times.

STEP 2
Once the pad is soaked throughout I fold the pad into a “U” shape and using my palms I squeeze the majority of the water out. Squeeze it several times until the majority of water is removed. The pads we sell are so durable you can also wring them out without damage!


STEP 3
Once this is done I place the pad in a towel and either squeeze or wring the towel that contains the pad. This method works great to remove residue water that is left from the first step, the remaining water will soak into the towel. You can also wring the pad inside the towel as shown here using our Dehydrator drying towel.

STEP 4
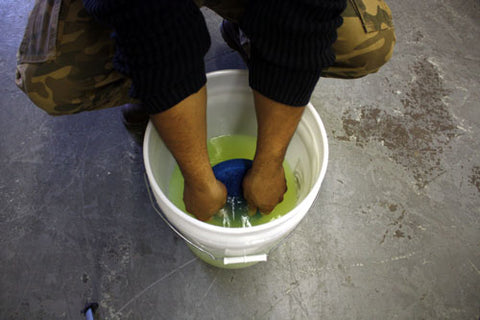
The last step is optional, you can use this method in a pinch instead of the towel method. If you used the pail to wet the pad you can now either empty the pail or just be sure to hold the polisher and pad below the rim of the bucket but obviously NOT into the water!

With the pad attached to the machine on a low speed hold the pad in the center of the pail and turn machine on for a few seconds. The pail allows the pad to spin dry while not spraying the water all over the shop and your legs. Once this is complete you are now ready to buff! You may read this article and think this is a lot of work but once you have tried the above methods you will see you can prep a pad in 1-2 minutes!
NOTE: During buffing the pad will start to dry on the backside. The face will stay wet due to the polish but the backside can become brittle and the pad can start to crack under the velcro. It may be necessary to completely re-dampen the pad during the job.
Pad Pressure
Even with proper pad prep if proper pad pressure is not applied your pad can be ruined. With not enough pad pressure your pad can fly off the machine, product will splatter all over, and the pad Velcro and backing plate can burn due to slippage between the two. Inadequate pressure will usually burn the backing plate and/or the Velcro on the pad itself.
Here is what inadequate pressure looks like, the backing plate is completely parallel to the pad and is not compressing the pad at all.

Here is the perfect amount of pressure, the backing plate is indenting the back of the pad about a 1/4" but is NOT crinkling the edge of the pad.

When too much pressure is applied it causes the backing plate to cut into the back of the pad and by deforming the Velcro it also causes the Velcro to detach from the foam. When you see the edge of the velcro deform and crinkle you are applying too much pressure.

Remember each different pad will allow different pressures. For example a blue pad requires little pressure before it deforms the pad but if I was using an Orange pad I would be able to apply more pressure before the pad deforms.
Here are a few pictures of damaged pads sent from customers, you can see the Velcro detaching and also the imprint from the backing plate due to excessive pressure. You can also see how the edges of the Velcro are crinkled.


Above are some shots that show the proper pressure that needs to be applied to the pad. You can see the back of the Velcro starts to deform and crinkle the edges when too much pressure is applied.
Pad Cleaning
If you do not clean your pads after use the compound/polish/wax will dry up into the pad causing the foam to become brittle, the pad will also be much tougher to clean at this point. I have tried washing pads in the washing machine with limited success, the exterior of the pad gets cleaned but not the center of the foam, there was much residue left. To clean foam pads you do not want to use a detergent that is high-suds, imagine a dish sponge soaked with soap, no matter how much you rinse it, soap will still bubble! The last thing you need when polishing a vehicle is bubbles! We sell designated pad cleaning powder such as Snappy Cleaning Powder. If in a pinch you can also use an all purpose cleaner such as Kleenzit.
Fill a 5 gallon pail with warm/hot water and add your pad cleaning solution. Now simply hold the pad under the solution and knead/massage the pad while submerged. You will actually feel when the pad is clean, it will first feel slimy then after 15 seconds or so it will start to feel squeaky clean!

If you are cleaning a large number of pads in one shot you may want to dump the dirty water and make a new batch of solution halfway through your batch of pads. Once all pads are clean fill the bucket with clean water and rinse the pads in that. Another option is to do this under running water until you see no trace of solution (the water will run clear at that point)
From there just squeeze the majority of the water from the pad and store. You can use the methods from the pad prep above to remove the water from the pad .I store my pads in a plastic container with a loose lid with a couple of holes in it. If damp pads are stored in a sealed container they will stink and can get moldy!